
Saturday 31 August 2013
Silhouette Flower Pot notecards
Here's a quartet of notecards made in my favourite ways - simple, easy and frugal!
 These lovelies began life as plain and simple card stock. A few minutes with a Silhouette Cameo began to give these rather rectangular characters a little more definition and interest. Throw in some ink, Pearl Pen, and a few Dew Drops, and - Viola! - something to cheer someone's day.
More Rooster Cards
I recently picked up a stack of papers while on vacation for a very specific purpose, but then was left with a huge bunch of paper. I know, that's just a terrible situation! But I faced that adversity with a smile, and here are a few cards that came out of that stack:

Thursday 29 August 2013
Rooster Birthday Card

I cut a 6x8 inch card base and a 5x7 inch mat with my handy dandy paper cutter, then fussy cut the various sayings. A little scissor-edge distressing around the edges, a couple of stamps, and a few button brads later - well, the card says it best: Ooh la la!
Here are a few close-ups to show some detail:


Hubby has a love of all things chicken-y (he even had one as a pet as a child!) so this card was perfect for him. And since I was able to add to my stash AND play with paper while on vacation, I came out a winner too!!
Wednesday 28 August 2013
A washi-ed Rooster
I bought a Recollections stack full of chickens, roosters, and all things French last spring. Here's one of the cards I quickly pulled together from that stack and a little washi tape from Tim Holtz:
 The 6x6 inch base and the 4x4 mat were quickly sliced into shape with a paper cutter but the rooster required fussy cutting. Yes, I actually fussy cut sometimes... but not much and not with pleasure. Unfortunately, this fella didn't stand out much on the black background of his original paper (see the bit left between his feet) and so needed to be set free.

Sunday 25 August 2013
Car Rally Thank You Cards
My church holds a community car rally each summer. This year, I was asked to make 50 thank-you cards to help show our appreciation to all the participants. Not a problem, right? How about having less than a week to complete this project? Yeppers - planning this project suddenly became important because I am not the kind of gal who backs down from a challenge. So here's the lot of cars, ahem, cards:


Saturday 24 August 2013
Fab{U}lous God-daughters
[Note: this was written November 2012 but it's taken this long to get the photos uploaded. I did say I was catching up... ;)]
It's been a lo-o-o-o-ong dry spell in terms of my craftiness, but I'm ready to let loose my crafting freakiness right quick! Okay, so maybe it's not freakiness, but I am happy to back playing with paper and glue and glitter and my Cameo and pearls and buttons and... well, you get the picture.
I saw this November monthly kit at a local scrapbooking store, Scrapbook Memories and More. Since I have always loved Simple Stories's paper designs (this comes from their Fab{U}lous line) and a recent photo of my 'adopted' daughter popped into mind as soon as I saw the papers... well, I just HAD to scrap. Playing with the paper and ribbons and buttons and charms... well, it didn't take long to come up with this:

And best of all, I had enough supplies left in the kit to do a second layout, this one inspired by my original muse's sister:

And for the details...
Weekend Market Cards
 I'm not usually a fan of pre-designed card kits, but this Bo Bunny kit caught my eye and so it came home with me. I liked the masculine feel to most of the cards, and needed a couple of {mostly} self-contained projects I could bring on the road with me. This kit was a lifesaver when I needed to vent some creativity while visiting Hubby at work in Calgary and living out of a hotel room.
Of course, I had to add a few of my own touches - distressing, inking, ribbon, jewels, or pearls - to each of the cards. I was very pleased with the final results and hope you enjoy them too.
The Beach... in December
We visited our stretch of sand during December 2010, but it took me almost two years to scrapbook the photos and another year to take photos of the layouts to share with you. It's tough to find a wintery paper collection that also has sandy colours in it, but Bo Bunny came out with the perfect paper - Snowfall. I scrapbooked these photos {finally} at the Great Scrapbook Carnival in 2012, and now you finally get to see them too! Remember how I wrote that I was so very far behind in sharing my projects? This is a rare peek into my finished scrapbook pages so please tell me what you think.

Some snowflakes were fussy cut from the papers in the collection, and others were cut with Spellbinders dies. Fussy cutting doesn't happen very often at my craft table - believe me! - but the effect was well worth the effort. I used chipboard from the set and Dusty Attic, and some inks and glitter. The detail in the Dusty Attic chipboard used as the title shown here is so delicate.

Some snowflakes were fussy cut from the papers in the collection, and others were cut with Spellbinders dies. Fussy cutting doesn't happen very often at my craft table - believe me! - but the effect was well worth the effort. I used chipboard from the set and Dusty Attic, and some inks and glitter. The detail in the Dusty Attic chipboard used as the title shown here is so delicate.
Friday 23 August 2013
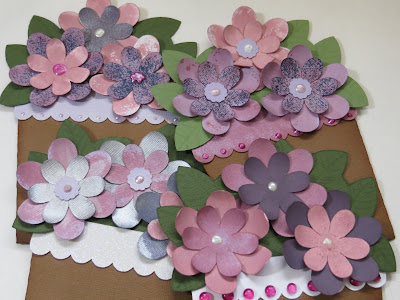
Happy Paper Anniversary!
Hubby and I just celebrated our second anniversary, but since I'm soooo far behind in posting my crafting adventures, you get to see what I made him last year instead of the simple card I made for him this year. The traditional gift for a first anniversary is PAPER - yep, my favorite-est artsy medium - so this was a no-brainer.
Here's the outside of the explosion box, adapted from designs available at the Silhouette online store and a Spellbinders borderabilities die.
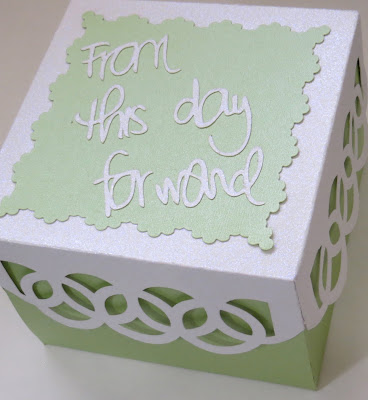
Here's the outside of the explosion box, adapted from designs available at the Silhouette online store and a Spellbinders borderabilities die.

Saturday 10 August 2013
Crafting but not blogging
I've been crafting but not blogging. My aging desktop decided to quit on me a while back (still waiting for Hubby to rescue the independent drive with my files on it) and so I didn't have equipment or a space for oh-so-long. Since then, a bright white apple greets people watching me on my shiny laptop, which I totally love. Learning a different (non-PC) way to do things took a little while, but this seems fair since I'm totally non-PC ways not related to electronics.
My next reason for not blogging: There were people to see and places to go. During the first six months of 2013, I spent about 50% of my time at home. And now I'm getting ready to fly east again so I don't promise when you'll see my next blog post. I promise that I'll start writing up some of my crafty pursuits so that they'll only be waiting for photos and can be published lickety-split when I return in mid-September.
I could give you a few more reasons, but let's face it, they're really just excuses. Let the typing, photo-editing, and coffee-drinking begin.
Subscribe to:
Posts (Atom)